Entering sales Receipts and Customize Reports in Xero

 When customer directly approach to our outlet/office and want to get services/ product/ inventory. We deliver it. How to receive the  payment of this transaction. It has procedure which is given below.

Step#1

Follow the steps and  select the given option.

Step#2
when we follow the steps and selected option. After that an interface will appear at there it will ask how to receive amount via bank account or on hand. If you are going to get money by hand then you must create any account in Chart of Accounts. Otherwise you can get through bank account. 
From bank account when you chose that mean an interface will appear. Put the details and save it.

Reports Customization 
Xero give us facility to customize the reports. the benefit of report customization is you can easily and quickly get the report when you are working.
The following simple ways by which we can organize and customize the reports. 
Step#1
Go to the Accounting tab and Select the reports option.
Step#2
In all reports summary there are number of reports. select any one for example we chose balance sheet. An interface will appear. In which chose the financial year, comparison of report of how many period do you want. If your business activities are new then select none. Finally select the accounting bases. We follow the GAAP in Xero so we will select accrual. In last bottom right corner an option of save and customize. Select this and go back to reports and check in customize reports. 
Step#3
You can get easily access to your reports also here. 


Receiving Payment in Xero

 It is very simple way to receive payment against any product/service. Below the sample adress how we can receive the payment. 

Step#1

Step#2 
when click on invoice option. This interface will appear front of us. I mentioned  awaiting payments these are our payments received which are due.
Step#3
In all awaiting list just click any client and you will get the whole information about client such as item code, description of product/service, quantity, account, pricing and so on. Looking below there is a receive payment option.  Select the payment date, method( account, petty cash) and reference of payment. Add the payment and you will get the green notification about payment receive. 


Entering invoices & payment in Xero

 How to book invoice there are two ways:

Step#1 Go to the + sign and click the invoice option. 


OR

Step#2 We can also other option such as go to business tab and select the invoice option.
Step #3
when clicked invoice option an interface will popup. just an example is given below. In this interface we can see multiple functions available. We can add new invoice, import or export existing list of invoices, approve or pay when due date comes. Number of uses in one interface. 
Step#4
There are many other options in new invoice. we can add new invoice or repeat it. We can also add them into groups also. One more interesting thing is there is also a reminder option we can set it for urgent or important invoice payment. It will help us to remind and pay our utilities or liabilities on time. 
Step#5 The interface on invoice is like this as given sample below. This is indicating how many transactions are we have, item number, quantity, description per unit price, how much payment is due against specific service/product and what is due date and total amount of liabilities. We can e-mail this invoice to vendor or authorities and take print also. 
Preview of Invoice is this type 
We can also delete invoice also 
These are the simple and easy steps to create, edit and delete invoices in Xero bookkeeping.


Creating/Editing item listing and reports review in Xero

 All those products or services which we are offer for the sake of business we add them into item listing.

Step#1 

Go to the Business tab and select the product and services category. 

Step#2 
Simply click on new item. after this a new interface will appear and you have to putt the relevant data in it. Assign item code and add other information and save it.

Step#3 
We can review the reports by this way as shows in given figure.
Step#4
We can custom any report by star mark when ever we need it we can use them rather then to search into in all reports. We can also Publish the reports when these reports are final. Also we can delete them these reports will move into Archives. 

These are the steps and simple guidelines for item listing and reports review. 


Creating/editing Chart of Accounts in Xero

Initially in Xero when we edit our entity profile, it gives auto-build some accounts populates according to nature of business. We can edit it later according to our business needs.

Step#1 On Accounting tab go to the advance and clicks the chart of accounts option.

Step#2
We can add new account. We can also delete any account but again Xero will not permanently delete it but that account will move into archive. We can add our bank account here. we can import or export files and we can get the print of these accounts all possible options are given and we can use.
Some accounts which are build-in by the software we can not delete them because these are core accounts on which accounting system is based. A lock sign is appears with these accounts as shows in below example.  


Creating/editing Customer & Vendors In Xero

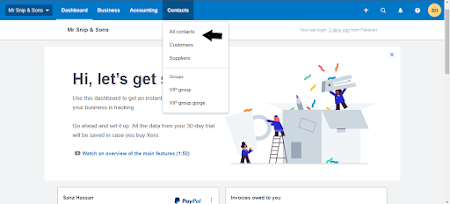
 In Xero when we want to add contact it has a separate tab is available.

Here are the following steps how we can add any contact in Xero. 

Step#1


Step#2 
When we create any contact it will not segregate either it is customer or vendor until we record any transaction either we offer services or hire services. purpose of the contact list is to update the list of persons or firms with whom we will interact for business purposes. So, it will equally treat as a contact before transaction. 
Step#3 
Add the necessary information of customer and save it. later on when the contact is generated you can edit it.
Step#4 We can add separately vender details and customers too. we can also import excel file from system to add number of customer/vendors for time saving. Similarly we can share list of our contacts by exporting tab. 
Step#4 
Xero never be deleted any contact. Lets say an old customer in our contact list and this list is become much long due to many other old customer with whom we are not dealing from long period of time. Or sometimes we omitted and creates wrong contact.  These are useless for this time we can merge all of them and send into archive.
We can also create special group of contacts for example we have a group of customers/vendor of similar company just sake of identification and simplicity we treat as a group and we can go into group we will find similar customers/vendor in that group. We will not waste time for searching out in all contacts.
Creating a group have many benefits like, we can check sales pattern, send e-mails and it build automatically for data base for further uses.

These are simple steps by which we can create contacts. 


Xero Bookkeeping Online Part1


Xero is cloud based accounting software which is used for bookkeeping in small and medium size firms.

In this blog I will guide you about perfectly clear and step by step instructions and how to navigate each part of Xero. This blog will help you and teach you about every common transaction type that can be entered into Xero. I will also show the whole process of manage and customize the most important reports in Xero.

This blog will help in a way you will be able how to record entries in Xero. So get in touch and seek to next blog and explore the details with step by step.